

I've always been a great admirer of the Spitfire and more so the later marks due to my involvement in the restoration of the Spitfire MK22, that is now on display at the RAAF Association Aviation Heritage Museum in Western Australia. As a consequence, when I was offered this kit at a discounted price at a recent competition, I just had to have it. Although my initial plan was to build it as an out of box model, when I saw what was available from the aftermarket manufacturers, I couldn't resist and ended up spending almost four times as much on the additions as I had on the kit. The aftermarket additions consisted of an Eduard detail set (73436), Eduard Brassin wheels (672146 - to replace the broken tail wheel), Eduard masks (CX334), Quickboost exhausts (72404) and some Master Models gun barrels (72-004).
For a new generation kit this has been one of the nicest builds I have done to date and it all went together without a single major issue. The aftermarket additions are also a great improvement and raise the detail to another level, however they are not essential as the kit will build into a very respectable model even without them. Like me at the end of the day the choice is really yours.
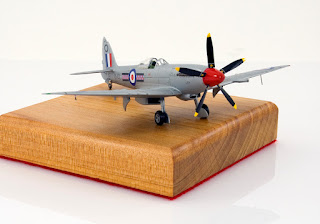
The thing that really grabbed my attention when I bought this kit was the box-art and from the outset I always intended to finish it in this scheme. After priming the model with Tamiya Fine Surface Primer (white) I then sprayed it with AK Interactive, Extreme Metal, Aluminium (AK479). Unfortunately this was a lot brighter then I realised and although it produced a beautiful finish, the colour was not representative of the correct shade of high speed silver. To correct this I then over sprayed the model with a very thin mixture of Vallejo Silver (71063) and Light Grey (71050) until I obtained the correct hue, which seemed to work very well. I then followed my usual process of Future, decals (which all went on superbly), panel line wash and Future, which sealed everything in prior to final assembly. With the exception of the propeller the model was then sprayed with overall coat of AK Interactive Satin Varnish (AK191), after which I then fitted the propeller and canopy and the model was done.
Airfix have produced a really beautiful kit of this iconic aircraft and their newer generation products bare no resemblance to those kits that I cut my teeth on, many decades ago. Although I have shunned their products for many years now, due to my past experience, I am happy to say that I am now a convert and plan to build many more of their newer offerings.


For a new generation kit this has been one of the nicest builds I have done to date and it all went together without a single major issue. The aftermarket additions are also a great improvement and raise the detail to another level, however they are not essential as the kit will build into a very respectable model even without them. Like me at the end of the day the choice is really yours.
The thing that really grabbed my attention when I bought this kit was the box-art and from the outset I always intended to finish it in this scheme. After priming the model with Tamiya Fine Surface Primer (white) I then sprayed it with AK Interactive, Extreme Metal, Aluminium (AK479). Unfortunately this was a lot brighter then I realised and although it produced a beautiful finish, the colour was not representative of the correct shade of high speed silver. To correct this I then over sprayed the model with a very thin mixture of Vallejo Silver (71063) and Light Grey (71050) until I obtained the correct hue, which seemed to work very well. I then followed my usual process of Future, decals (which all went on superbly), panel line wash and Future, which sealed everything in prior to final assembly. With the exception of the propeller the model was then sprayed with overall coat of AK Interactive Satin Varnish (AK191), after which I then fitted the propeller and canopy and the model was done.
Airfix have produced a really beautiful kit of this iconic aircraft and their newer generation products bare no resemblance to those kits that I cut my teeth on, many decades ago. Although I have shunned their products for many years now, due to my past experience, I am happy to say that I am now a convert and plan to build many more of their newer offerings.


